Wednesday, October 31, 2012

A Tale of Two Hutches...

Happy Halloween!!!  I have to admit, it is my FAVORITE holiday.  Picking out costumes with the kids, going house to house trick-or-treating...and decorating my own house like it's being attacked by giant spiders!  Always a good time in my book :D  Although deorating is getting more and more creative with the onset of Pinterest, I've gotta step up my game next year.
Hope you and yours have a fun, safe and Happy Halloween :)  Here are some pics of ours last couple years;
Halloween 2010-love how color coordinated they ended up!


Halloween 2011 ( disclaimer: I made my husband put cat ears on for pic:p)

He later switched  to a brain sucking spider-much better!
Kids with 'Skully' our beloved skeleton who has been with us for as long as long as they have! That's a black rose we tuck into his mouth.  He usually kicks back on the front porch for Halloween.
But this year he's excited to be hangin' out in the bushes.


Okay, on to furniture: Finding a decently priced hutch is difficult and often they are too large or do not come apart from the table or cabinet they sit on making it impossible to transport without renting a truck.  The older, prettier ones usually have the shelves affixed as well, so painting every nook and cranny is more challenging.  But I managed to find this one on Craigslist (of course). It was in two pieces and was much newer.  It also had a particle board backing which was a disappointment but was still sturdy and in fine condition so I went with it.  You can always replace the backs with something cut to size from the lumbar section of your hardware store too, I was just being lazy.


This is a good example of when to use chalk paint, the real thing or making your own.  A newer piece like this, begs for something more of a matte finish to add age to it.  You could use a matte latex as well, but I was concerned about how well a latex would adhere to this piece due to it's slick surfaces.  Lots of prep work (deglossing and/or sanding) was avoided by making chalk paint this time.  Another key technique is glazing, which I did all over.  The lines on this were so simple-very little detail, so adding a glaze brought out the crevices, curves and made it look less 'contemporary'.


I removed the original wood knobs, and replaced with cut glass and brass ones.


Well, it must have worked-I sold it to a famous movie director currently shooting a western here in Austin!!  It's going to be staged in a candy shop where some scenes will take place.  I am so excited!  Although I was kinda bummed it won't enjoy a nice, quiet new home displaying someones treasures.  I wonder what happens to movie furniture once they are done with it?  Now I'm on the look out for some old apothecary jars for him to place on the shelves....anyone with a tip please let me know?:)


The second one is another contemporary piece I picked up off craigs.  Even more simple than the previous one, but it was solid pine and having the 'beadboard' look with the planks was something I thought would be so adorable when finished.  I painted it in a stark cool white to give it a beachy/cottage feel and distressed it.  No glaze and no wax on this one, just sealed it with varathane.
Photo from the craigslisting

I picked up the chicken wire basket at Marshall's.

Lots of storage options!


To me this piece seems really versatile in that I can totally see it in a bathroom storing towels, pretty soaps, etc, or in a kitchen displaying teacups and old silver, or even as an entry way console for keys, bags and backpacks. I just love it, however it doesn't 'fit' our homes style so I must let it go. 

Alright off to trick or treat-have a great night everyone, no matter how you celebrate! XO

Wednesday, October 24, 2012

Louis XVI Chairs-Learning upholstery

Happy Fall to Y'all ;)
It's so nice to have some relief from the blazing sun, however it is still in the upper 80's and quite humid here.  But the mornings are cooler and the breeze is back so while I'm not able to bust out the riding boots, jackets and scarves (well I could but I'd look like a crazy person), it's a nice break.

This post is long overdue-I took an upholstery class over the summer at the Austin Upholstery Studio that was AWESOME! It's taught by two accomplished upholsterers (Mike and Paulette)  who run their own shop where the class is taught.  They keep the class sizes small so it's really fun and I met a lot of wonderful people, all of whom had a different reason for wanting to learn upholstery.  You can bring any kind of furniture piece too, from a stool to a couch (however you probably won't finish that couch within the 6 wk class time)  I chose to redo a couple Louis XVI antique chairs I picked up last year that have been collecting dust in my garage.  I won't get into too much detail on how-to's as you can find many tutorials online already and I didn't take pics of every step unfortunately.

First we had to strip them, which I did mostly at home.  These were stuffed with hog hair! What they used back in the day.

All stripped and ready to be painted-I painted them in an antique white before taking back in to the studio.

I think I have mentioned somewhere (etsy, facebook, or maybe here on this blog) that many of my family members are painters (artists), upholsterers, seamstresses, and antique restorers.  So by osmosis I guess, I picked up a few things-including the confidence to attempt some of these.  But WOW, do I know my limits, and upholstery is definitely one of them.  It takes so much patience, skill and diligence.  I more than a few times felt like I had gotten in over my head, and it didn't help that I picked one of the most difficult styles to reupholster :p

These chairs had springs in them, which are completely hand tied and meticulously retied with twine until all are sitting straight, pulled down to different heights and tensions, and tightly connected to each other...all to create the perfect curve and support of the seat.  My fingers were raw after the first hour and it took almost 6 hours for me to get the first one done :[

The blue tape was to mark the direction all the springs were to be facing. 
You then cover with burlap and begin the process of creating a seat-something I didn't get pics of but it's lots of foam, edge-roll and poly filling.
That's Mike, one of my instructors helping me decide how to do the corners.
Once the class was over I still had homework to do;  affix the welt cording with a glue gun and reapply wax to seal the frames.
And Voila!  Ready for a new home :)

I just love the details these chairs have!!

Dark wax helped to showcase the lines and curves better.


Well that's how I spent some of my summer.  I still have 3 more of these beauties waiting to be redone, it may be until next summer before I get the courage to try again though!  We'll see.  Thanks for reading, more soon! XO

Wednesday, August 29, 2012

Latest using latex and chalk paint

Big deep breath...exhale....the kids are back in school...YIPPEE!!!!  Finally some down time, finally some cleaning that lasts, well, for 8 hours at least.  Sit down, catch up on your magazine subscriptions, go for a walk, exercise without needing sitters, grocery shop without needing the Cadillac sized carts, go back to work without needing to pay for childcare, etc. etc.
It's all good until homework starts :)

I have a few projects I worked on over the summer, and some just this week that I thought I would share.  Some were done using Latex, some with Chalk Paint and I will group them that way to help give a visual as to the differences.  See my previous posts where I talk about the differences and my personal tips for working with each.

I picked this dresser up via craigslist from a woman who let her teeny Teacup-Yorkie bite the heck out of my ankle while I was introducing myself.  It didn't hurt but I was a little taken back when she didn't stop it. Then she had the audacity to tell me there was no way this was going to fit into my van and I was wasting her time...a-hem.  Luckily her husband came out and swiftly replaced her to help me load it into my all too roomy, more than accommodating Odyssey!  He then explained their 26 year old son was finally moving out, and they were selling his stuff.  O-kay, all was forgiven.

I'm still in search of the before pic, and  I KNOW I have it..but here it is, in a nordic blue latex, after:
This sold to a med-student moving into her new place. Her sweet parents picked it up for her along with her 2 dogs and cat inside the trucks cab and a washer/dryer in the back!  In my head I thought 'this is your future'. I hope I can do it with as much energy as they had! ;D
I love me some deco, I know it's not so popular these days but it is so unique and if you can stay true to the style when refurbishing it then you will always find a buyer.  This was a waterfall style vanity that I was anxious to try a turquoise on.  It sold to the perfect person for it too!
I applied a dark wax to the details to make it look authentic and aged.

The wax warms up the brightness of the turquoise and makes it look like it has all been there for years.


I just finished the below set today-we are having a big labor day sale at the Antique Mall and I wanted to get some new stock in. I used latex, in a robin egg blue shade that I am fond of.  I recovered the seat this morning, distressed it all, sealed it, loaded and unloaded it.  I've earned my glass of wine tonight!

Perfect for a little or big girls room :)
Highboy Dresser with crystal knobs

Matching vanity with mirror, original stool.


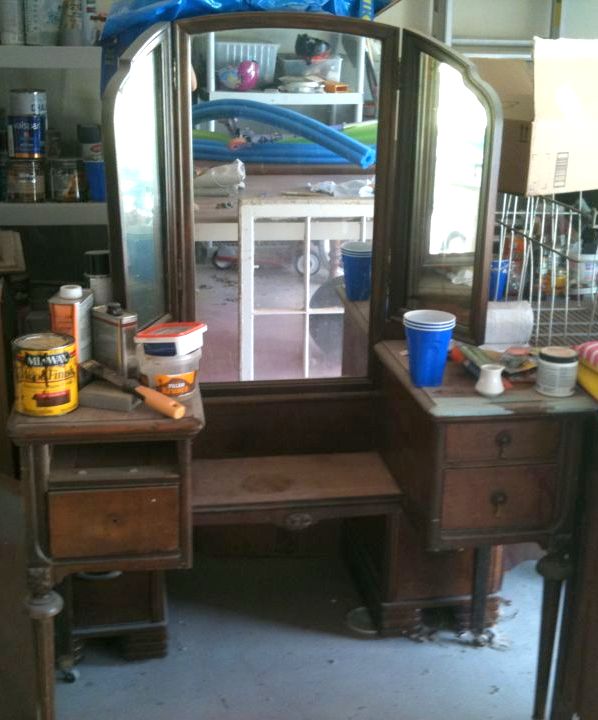
And here are a couple chalk paint vanities I did this summer.  I have to share the story of this first one...I picked it up from a guy who travels a lot for his job.  It took weeks to schedule a day to see it. He said he was selling it for his buddy who had moved with his girlfriend, out of state.  He was simply the middle guy, and his buddy was asking $100 for it.  Well when I showed up, it was covered in melted candle wax and missing some of the hardware.  When he couldn't get one of the drawers open, he took a butter knife to cut through the wax and jostle it open.  When he did, we found one very large...how should I say it....adult toy.  I swear, honest truth.  I immediately bartered for 1/2 off the asking price.
Before (that drawer was being 'sanitized' when I took this!)
After-Good as new!!
More dark wax along the edges, legs and details.

Okay, shake off that last story.  So here is another vanity (not much variety in this post I know!) but college students are getting settled this time of year, so desks, vanities and dressers are in demand.  Plus they are just so fun to do and I really love meeting the 'kids' that come to buy them. I used Annie Sloan chalk paint on this one as well, but this time used a glaze (wood stain mixed with a glazing agent) to darken and age it a bit more.  Click on pics for more detailed images.
Original stool, recovered in a textured velvet.
Anthropologie crystal knobs with gold accents-so pretty!

That's all for now-my 8 hour break is officially over ;)  I'm off to feed, bathe, and practice writing with my future college students (fingers crossed!!!) :D
Cam

Thursday, August 9, 2012

Part Three-Milk Paint vs Chalk Paint vs Latex

Part One-Milk paint
Part Two-Chalk paint
Part Three-Latex  

Latex, Latex....how do I love thee?  Not just any latex though, as all are not equal. The wrong Latex can be a rubbery mess sometimes that doesn't adhere well or will scratch at the slightest scrape of a nail. But a good brand of latex applied properly can achieve anything!  While chalk paint or milk paint would help a piece achieve a certain look easier, all can still be created with latex.  You can distress it, glaze it, chip it, wax it, clear coat it, etc.

There is oil based or there is water based, and you can use either for furniture.  I like to use water based latex because it's odorless (almost) whereas oil based latex smells toxic immediately.  Water based latex washes off your skin and other surfaces easier, and it also dries much faster.  I have only had problems with it when I have bought a can of 'oops' paint (paint mixers mistakes, usually in a gallon size that sell for 7 bucks-beware of these!) or if I hadn't mixed and remixed it enough between uses. 

I have used a few different brands of latex and I will say that by far my favorite (I am NOT getting paid to say this, it's strictly my personal opinion) is the Behr brand sold at Home Depot.  Valspar isn't bad, but on occasion it's had more of the 'rubbery' feel to it and takes more paint to cover a piece at times (not to mention it took DAYS to get it out of my nose ;p sorry but it's the truth).  I have had both negative and positive outcomes with Glidden for the same reasons.  Martha Stewart's brand is really nice too, though I think it's being phased out in the stores?

No matter what brand you use, make sure you let latex dry completely before doing any other techniques with it.  It's a good idea to wait 24 hours if one to two coats were done, 48 hours if 3 coats were applied before you distress or seal it.  The reason being latex, by virtue of it's rubbery nature will shrink and expand depending on the climate until it's fully cured. In fact, latex takes a good month to cure completely, so if it's going to be a highly used piece of furniture (like a dining table or chair) let it sit in your garage or a low traffic area long as you can first. It doesn't have to be a month, but the longer the better for the finish to hold up.  Just my two cents.

Some other benefits of Latex are....

You can distress it easily;

Click on the pics to see better detail

Chair and table were both water based latex and distressed.

Example of the distressing on latex


Desk painted with interior latex and distressed with a fine sanding block.


You can wax it
This little table was painted with 'Creamy White' which is a dead-ringer for 'Old White' by Annie Sloan (you're welcome) by Behr and then sealed with a clear wax. I then added some age back to it by applying a dark wax onto the carvings and along the edges;
Before Dark Wax:
After Dark Wax:

You can give it a 'Chippy' look;
I used Glidden brand on this desk, then scraped the paint off.
I use butter knives, scrapers, whatever I have on hand.
This was a moderate chippy look-you can be much more aggressive with it and peel more back.


Glazing it is easy;


I don't always like to glaze with chalk paint as the dry 'stone' like texture of chalk paint can soak up too much to quickly.  You don't have that problem with latex though and can control the application of it.  I have glazed it with watered down stain, or a stain mixed with a glazing agent.  Both work great!

I used stain mixed with a glazing agent and wiped all over for a subtle yellowing affect.
This time, I applied stain directly with a brush and followed with a rag.


You can buy additives for latex to achieve different consistencies;

For example, if you are painting by hand with a brush and want to decrease your brush strokes as much as possible then buy some Floetrol. It won't alleviate them entirely but it does help!  Just follow the instructions.

Buy here or in store
You can also create something close to chalk paint which I discuss in detail here and here.  By adding either unsanded grout, calcium carbonate or plaster of paris, you can give your latex a more chalky consistency and matte finish.
Before
Applied first coat of latex mixed with calcium carbonate

After, and I applied an all over glaze as well as dark wax to seal it.
Lastly, the cost and color options!  

Endless colors to choose from, I have an entire drawer filled with paint swatches that I open whenever I am in a bad mood ;)  They inspire me for some reason.  Both milk paint and chalk paint are limited in their color options however both can be mixed with their own colors to achieve different ones.

Latex comes in sample sizes for $3-$5, quarts for $12-$15 or gallons which range from $20's to mid $30's depending.  A gallon is more than you would probably ever even want of one color...it would last you longer than it's shelf life.  One quart will paint 1-2 dressers or desks and a sample size will cover a vanity or console style table.  Pretty good bang for your buck!!

Well that's it for my series on the three types of paint.  Click on the links at the top of this post to see my advice and thoughts on working with Chalk paint and milk paint.
Thanks for reading!
XO