Tuesday, August 30, 2011

Tricks and Tweaks

Sometimes things just need a little 'tweak' to make them more interesting.  Like this newer Vanity I found last week; it was probably made in the nineties or maybe late eighties and kinda had that 'Dynasty' effect going on which is fine, but not my thing.  The middle drawer wasn't a drawer at all, just had a pull on it to make it look balanced when it was actually a lift-top style, very cool!
I wanted to make it more vintage looking yet keep it girly.  I was also dying to paint something grey!  So while I waited at Home Depot for my paint to be mixed I killed time exploring the lumber side of the store. This is also where they sell moldings, wood trim, wood table legs, and appliques like this one:
This costs about $5.00, others are less.

I grabbed my new grey/gray (?) paint and the applique and was off to Anthropologie to check out knobs next (any excuse to go there right?!)  They sell beautiful hardware, but a bit higher priced then you would find at say Hobby Lobby or Ebay.  Another good place is http://www.leevalley.com for their amazing collection of vintage styles. 
So several hours, (a dress, a sweater) and 2 crystal knobs later......yikes.

I got to work (to pay for that dress and sweater).  First I took wood filler to the two holes on each side drawer, as I wasn't going to use pulls but rather the one screw knobs I got at Anthro.  Then I drilled a new hole in the center of each (I wish I'd taken pics of this step, but hopefully you get the idea).  Then I glued the applique to the center 'drawer' to cover the two holes there.  Some paint, some new fabric on the seat plus those crystal pulls and we got this:

I haven't decided on the fabric yet so it's not attached and looks a little sloppy here, but all it takes is a staple gun.
Another trick I've tried from visiting the same aisle, is using trim pieces to modify plain looking or more boxy shaped furniture pieces. 
These come in different widths and designs

I got this bookshelf a while ago on clearance from Tar-jay, painted it and stuck it in one of our nooks in the living room.  It looked okay but after I put all my 'knic-knacs' inside it still looked too plain.
So I picked out a long piece of trim/molding, these cost about $8-$12 depending on size, style, etc.  And had them cut two pieces to the width of my shelf.  Then I took them home, painted them, let it dry completely and glazed it to show off the details a little more.  This is done by taking wood stain, mixing with a clear glaze about 50/50 and wiping it on, then wiping it off-that easy!! 


What remains in the crevices is what showcases those details and gives it an antiqued look.


Then I glued one on each end of my shelf using clamps, heavy cans, books, whatever I could find to pressure them down!
I know it's a subtle change, but it made a difference in taking a cheap shelf and making it look a little nicer.  Plus the shape of the detail blends in with the pieces on the shelves themselves, bringing it all together. 

I'm off to pick up another desk, any color suggestions?  I'm trying to deviate from blue but it's hard!!  I'm all ears if anyone has a color idea. Till next time...

Sunday, August 21, 2011

New Desks

Hello Friends,
This has truly been a hectic week and as my 3 munchkins are entering school at the same time for the first time, I am a basketcase tad bit anxiety stricken.  Business has been a little slow as well, which I am sure is relative to the end of summer and back to school.  But it doesn't help my nerves either!  I took some risks with these last two desks...one was a complete re-constructional mess and the other I just went with what I had on hand.  I guess I had grown a bit bored with my usual blue and wanted to try something new.  Next up I am going to do some dining sets, dressers, etc just to get out of my comfort zone. As well as some upholstery projects so stay tuned...

First desk was pretty at the onset but once I  looked deeper I saw just how much work was ahead of me; chipped veneer in multiple areas, one whole side was completely unattached, and scratches so deep my sander couldn't buff out.  But fun is fun and I love a challenge.

I used paint cans to pressure the side after I re-glued it.
I really wanted to try something different with this one, and the hardware begged replacing so I just went in the direction of things I found that worked.  Here is the final result:


I used a Jade Green color and then glazed it, added copper rose detail hardware to match the wood top.
 The next one was an antique vanity, very pretty but missing one (just one, dang it) piece of hardware so I had to find replacements (Thanks Mom! )  and I used some 'oops' paint from my local Home Depot...this is a shelf by the paint station that sells mistake colors for super cheap.  Like $5.00!  Always check it out when you go looking for paint.  You never know what you might find in there for a fraction of the cost.

So here is this Miss Vanity at the start:
Left middle drawer was only one missing a pull.

Here she is with a brighter blue, some distressing and 'new to her' antique hardware that fit the bill:


I want to say a big THANK YOU to my friend Danielle who put one of my desks on her Pinterest page!  You can check out her amazing 'Favorite Places and Spaces' here;  http://pinterest.com/thecrayonbox/favorite-places-and-spaces.  She also has the most ethereal collection of REAL treehouses and Castles!  I'm completely captivated..check it out for yourself.  More soon :) XOXO

Linking up to this party:

<a href="http://www.perfectlyimperfectblog.com/" target="_blank"><img src="http://www.perfectlyimperfectblog.com/images/badge.jpg" /></a><br />

Wednesday, August 17, 2011

Back to School and a trip to IKEA

I apologize,  while I have been frantically busy with projects, I don't have any furniture postings ready today. This is a more personal one because it's back to school time -YIPPEE!!!  I am very excited and yet also completely panic stricken that this is the first year all three of my little ones will be entering school.  My oldest son and daughter will be in the same school (FINALLY-no more multiple drop-offs, pick-ups and schedules), and my youngest is entering preschool! Where did the time go?
He is having NONE of it, btw.  He's only 3 and keeps saying "no- me baby" in protest. It's so darn cute ;)  I don't want him to go either, but he needs to and it's going to be good for both of us....I think.

As with most Preschools, they require all kids be potty trained and this was a non-issue until he overheard me say it.  Suddenly he's hiding his underwear and digging out the pullups.

So this week - like all Moms right now -  I loaded up the gang and we hit the stores. We stocked up on their varied school supplies, some new duds, backpacks, etc. and then we hit the local IKEA (they have those awesome childcare centers and this mama needed a breather!) which I hadn't been to in ages.  I must admit that I was never an Ikea fan.  I mean buying plywood that you then have to spend hours assembling yourself? No thanks.  Not to mention it often requires our significant others to help and we all know what a 'bonding' experience that can be...but have you seen their latest catalog?  Some serious chicness all the sudden!  They are starting to incorporate a more french/cottage/vintage like aesthetic to some (and by some, I do mean a small minority) of their products. Like their Ektorp slip-covered couches, sectionals and chairs-OMGosh?! 


I know some people still think it's crazy to have white furniture but I can't say enough about it; slipcovers really are a moms best friend.  A pet owners best friend.  I even have one in our play room - so easy to strip off the covers, wash (bleach even) if needed and throw back on.  I bought ours years ago from Ballard Designs and while it's held up, I paid 5 times as much as these Ikea versions.  And the versatility it brings you in changing the rest of your decor?  Priceless.  Seasonal decor and color accents can change with the wind when you have a neutral foundation. Here are some inspirational pics:


If you are handy with a sewing machine, you can even make your own for your current furniture!  Don't believe me?  Check out this gal, she shows you how it's done:
http://missmustardseed.blogspot.com

I also oohed and ahhed at Ikea's grain-sack (looking) tea towels, place-mats, ticking fabric seat cushions, etc.
.79 cents a piece!
So cute for wood dining chairs, and of course, washable.
Some really cute vintage-inspired stuff!  And I will have to make another trip back. But at the end of the day this was all we really needed:


Yep, a 4.99 potty seat.  He picked out the bright red version, so now it's crunch time at our house.  I'll be posting some more furniture transformations toward the end of the week, but till then and to ALL the Moms (and Dads) out there working so hard to support, provide and prepare our little ones while dealing with all the anxiety and mixed emotion that this time of year brings-hang in there!   XOXO

Thursday, August 11, 2011

Farmhouse Table

This is just a quick post to give myself yet another excuse to talk about my newly redone craigslist table :)  And I thought maybe some might find it informative how I achieved it in order to try yourself. Pick up any Home Decor mag or catalog these days and there is a version of a factory made 'farmhouse' table.  But the prices?!?! OMG-and even if you can, should you? There are numerous blogs and how-to's on the web when searching for instruction.  That said, every piece turns out different no matter how well you plan it, but that is part of the fun.
So this was our old dining set we had for the previous 6 years:
Very 'clean' lines, very kid friendly and held up to 3 children so no complaints.  And I was actually considering stripping this set down to attempt the provincial/farmhouse look but then thought...nah, too much work! Lets start with a craigslist one, redo it, sell it.  Then see if this is something I wanna repeat for myself.  So I scored this one off craigs, for a mere $60:
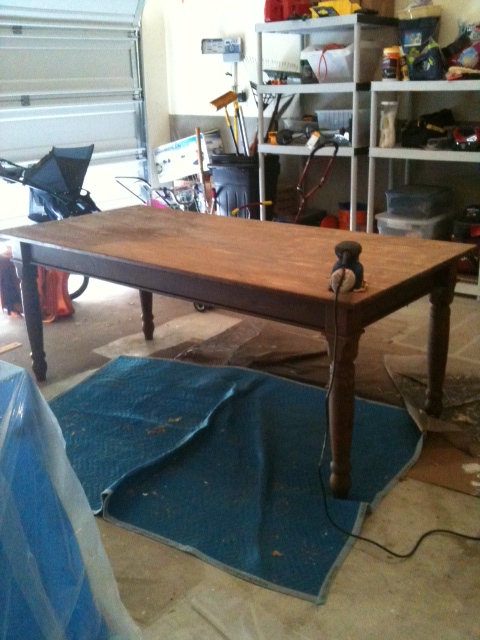
I wish I had taken a REAL before photo, not mid-sanding, as this table was so thick with laquer and stain I can't  tell you how many times I thought I'd gotten in way over my head...but it worked!  I had to apply layer after layer of stripping agent (starting with Eco-safe brand, then resorted to the hardcore stuff ) to get the layers off but then after that, sanding was a breeze!  Here are the 3 products needed for this part of the job;
A stripping agent, (use an Eco-friendly one if you can), a puddy knife, and a power sander. Although  you could try by hand if you wanted to. 

Then I made my first attempt at a technique called 'whitewashing'. This is achieved by taking a white or ivory colored interior paint, mixing it 50/50 with water (no set rule just a guideline) and applying with a smooth lint-free rag, or a brush.  You must do this in small sections at a time going in the direction and grain of the wood because you want to then follow 20 seconds later with a dry cloth and rub in as well as soak up the excess.  Here is what mine looked like at first:
Not bad but a little 'streaky' and with this crazy Texas heat I shouldn't have done this mid-day, as it dried too fast, before I could rub it in.  But that is nap time in my house!  Momma has to work when she can :) I panicked a little, but then decided I'd take my trusty power sander and try to smooth some of it out.  I then painted the base 'Antique White' by Behr and followed the next day with a couple coats of paste wax on the body, and 3 layers of wipe on poly on the table top to seal it all.
Paste wax on legs and body, 2 coats.  Wipe-on Poly on table top, 3 coats.

I didn't do any extra distressing on the legs because I know my 3 kids will more than take care of that. I truly had every intention of selling this but the drawers are what sold me, I had to keep her!  Napkins, extra silverware right at your fingertips? Sign-me-up.  Here she be:

And just for comparison sake, there is a table sold at Pottery Barn with similar design, but selling for 1499.00...
Pottery Barn 'Norfolk" dining table

Horchow sells this beautiful 'Seaside' table, which I was pining over a looonng time,  for 1199.00;
1199.00 just for the table!  Chairs not included.
So I'd say I Frankensteined a mix of these two in a way, the best of both without the heavy hit to the pocketbook. And if 'farmhouse' or 'provincial' style dining is something you are thinking about, there are ways to achieve it with nothing more than a trip to Home Depot and scouting your local Craigslist, Goodwill or Estate sale for a worthy solid wood table. 
Thanks for reading!  Till next time...:)

Sunday, August 7, 2011

About that door...

So I learned two very important lessons this week for a first time blogger:
1. Never give or promise a set day for a future blog.  As in "Hey! Stay tuned next friday..."
2. Make sure you are not setting too high expectations.  As in, be clear what you plan to present, so as not to disappoint :)
Now remember that door I bought last week?

There are so many wonderful ideas of what to do with a vintage door, it's amazing what you can dream up.  Here are just a few I have found:

Great entry way idea, or for extra storage in a bathroom.

Ahhh Seattle, never thought I'd miss the rain!

Another entry idea.

LOVE this one!  Magnetic Chalkboard.


And check out this coffee table made by the super talented Sausha at http://www.theshowandtellblog.com/


 But I was looking to add some sort of architectural interest.  We have large open spaces in our house (it is Texas after all) as well as lots of huge windows.  So this doesn't allow much room to hang pictures or artwork and it takes a lot to make things feel 'cozy.'
I am a big fan of Maria over at http://dreamywhites.blogspot.com who manages to achieve this so beautifully!  She has large pieces of salvaged architecture like doors, window panes, a mantle (with no fireplace mind you) all over her house.  It's gorgeous and so worth checking out her site if you like that sort of vintage glamorous, prairie style.
About a week ago, we sold our old dining set which was cute, kid friendly and totally functional but we were sorta over it.  Plus I had refinished this old table from Italy that I found off Craigslist for $60(!!!) and couldn't part with:


I added some chairs also found off Craigslist for $30, painted them to match and it was Bon Apettit!  But once I saw it in the space it seemed a little cold, boring even. I remembered that sea foam green door 'hidden' in my garage and thought I could try to achieve a similar look...it's not perfect and the room is definitely IN PROGRESS still but it's a start!


I plan to replace the two end chairs with slip-covered parson ones, hang some drapes and find a good centerpiece.  Like maybe a large stone urn or a tray filled with old Japanese glass balls like this:

It may be a challenge just to get the slip-covered chairs in there though, the hubs says "it makes it look like things are in storage." lol  Stay tuned!  more soon...  :)